Table of Contents
The sales of factory prefinished wood floors is a rapidly increasing segment of the flooring market. In the past 10 years prefinished wood floors have shown an average of 10% increase in
sales per year which now account for the majority of all hardwood floor sales.
Factory prefinishing operations have traditionally been the domain of large companies that
produce commodity strip flooring. These operations require large capital investments and
engineering expertise. The resulting factories are production driven operations that are efficient
yet inflexible to some niche market demands.
Currently, there exists a demand for small lot quantities of prefinished floors to satisfy an
increasing and lucrative market niche. This demand is driven by:
- General style changes to wider width floors and custom looks.
- Environmental considerations that promote local manufacturing.
- Excessive production of low cost commodity flooring as a result of globalization.
These shifting market trends are creating a demand for machinery and knowledge to custom pre-
finish at the local level and with a wide range of finishes. This movement is similar to other craft
movements that have recently redefined other products such as beer and cheese. We define craft
finishing as follows:
A machine driven process undertaken to produce products of high value in
low volumes in a factory setting. It seeks to be flexible, style driven, local, and environmentally
friendly.
However, the “how to” knowledge for craft prefinishing can be very difficult to obtain. In the
past, it has been a combination of information from coating suppliers, machinery people, and
tribal knowledge from industry professionals. The custom finisher often does not have the
access, time, or engineering personnel to implement a manufacturing operation to factory
prefinish.
This overview will present a summary of the basic information available on craft prefinishing as
a factory operation. It will cover history, coatings, line layout, machine operation and industry
terminologies thus giving an early advantage to those who enter this field with limited
knowledge. It can serve as an introduction to machine prefinishing as well as a reference manual
for basic machine understanding.
The information presented here draws from a base of knowledge that reflects the market and
technologies available at the time of its writing. As style, markets, and technologies evolve the
information contained herein should be viewed in that perspective.
Chapter 1: Prefinished Wood Flooring Market
A Little Wood Floor History
The wood flooring of today is the most recent stop in the evolution of floor materials beginning
with the beaten earth floors of early times. According to A Brief History of Wood Floors “as late
as 1625 most European homes still lacked a wooden ground floor.” Early mentions of wood
ground floors were noted in France during the Baroque era (1625-1714.) These floors were often
decorated, painted, and detailed much like artwork.
This movement towards wood floors was naturally embraced by the new American colonialists
in the 17th century. The New World was overflowing with forests. The abundance of wood
provided an inexpensive and easily obtained construction material.
In many areas trees were so ubiquitous that they presented a near impenetrable barrier to
expansion. Many a colonial farmer were known to curse the vast forest that required back
breaking labor to clear for farming and habitation. Wood was everywhere!
The colonists discovered that the heartwood of the pine tree offered tremendous advantages as a
floor material. The extreme resistance of heartwood to decay and insect infestation were key
properties required for wood at ground level. The colonist fabricated wide planks and attached
them to floor joists with nails or wooden pegs. Floors of the time were either unfinished or they
received a coat of a plant oils.
These floors continued to be desired into the 19th and 20th centuries until the advent of modern
production materials such as broadloom carpet, linoleum, and other synthetic materials.
Following the Second World War wood flooring was in decline. Synthetic flooring materials had
become the standard while wood floors became a specialty item. Existing wood floors were often
covered over with carpet or vinyl in order to avoid any maintenance. During the same time the
benefits of mass production were being applied to manufacturing wood floors. The efficiencies
of factory production and new styles such as wood parquet allowed pre-manufactured wood
flooring to compete in quality and price against carpet.
The challenge facing factories in finishing wood flooring was the field performance of the
factory applied coatings and the difficulty in drying the finishes. Typical production rates for the
machining of the flooring by planer matchers could be in excess of 300 feet per minute. In
contrast, drying most solvent finishes or oils at these speeds was impractical.
In response to the need for high speed drying, the first factory finishes utilized hot waxes that
were applied by roll coater. These could dry quickly and were adapted to high production
environments. They offered the advantage to the homeowner of having a pre-waxed product that
they could refresh and maintain themselves.
However, wax finishes lacked the resistance that the market needed. Solvent based poly finishes
emerged that included polyurethanes and acrylic urethanes. These were high resistant finishes
with excellent performance but still field applied. The next development in coatings was the
evolution of ultraviolet cured (UV) poly coatings in the 1980’s. These coatings contained no
solvents for evaporation and cured instantly upon exposure to ultraviolet lamps. At this point
coatings could cure at high productions speeds. Machining technologies and coating technologies
were at last in harmony.
Advantages of Prefinished Floors
In addition to the ease of drying, the UV cured coatings were extremely durable. The flooring
was easy to install, and onsite finishing was not required. These advantages along with
consistency of product (assured by the factory controlled environment) have propelled the
market forward into the 21st century (see Table 1, below).
Advantages of Prefinished Floors
| Consistency of Color | Aluminum oxide abrasion resistance |
| Consistency of finish thickness | Can undergo lab testing |
| Faster and easier to install | Factory warranties |
| No chemical or solvents on site | Lower maintenance |
| No sanding on site | Easy to rematch colors |
Emerging Trends
UV prefinished floors have been well established since the 1980’s and presently represent
more than 50% of all hardwood floor sales. However, designers and customers are now
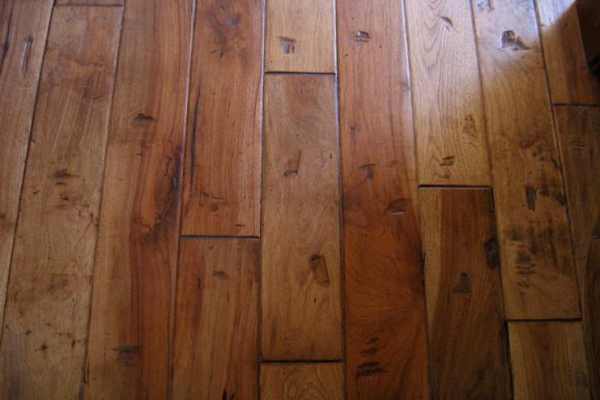
demanding more custom styles, wood choices, colors, and finishes. These include oil finishes,
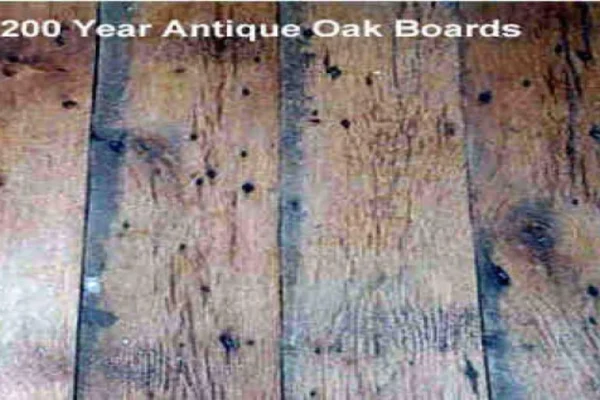
matte finishes, hand scraped products, reclaimed woods, and multi step color treatments.
There is a growing market segment in niches that have been historically considered craft work.
This custom work has usually been the domain of onsite finishers. Due to the advantages of
prefinishing and the increased sensitivity to the environment the factory finishes that are LEED
compliant are in high demand. New technologies, many originating in Europe are meeting these
style and environmental requirements.
Chapter 2: Choosing the Appropriate Finish
Appearance
The appearance of the finished floor is determined by the category of finish chosen. Floor factory
finishes fall into two general categories: Film finishes and Penetrating finishes.
- Film Finishes sit on top of the substrate and form a barrier to the effects of wear and the ambient environment. They are applied in several successive coats after application of a color coat. The finishes themselves are manufactured in many gloss levels ranging from matte to satin to high gloss. They are typically clear finishes but are also available as opaque colors.
- Penetrating Finishes seek to retain the natural look of the wood. They are usually oils derived from plants or biomass. Upon application they are absorbed into the wood and bond to the wood fibers. Thus, they reinforce the wood and not cover it. Penetrating finishes usually exhibit little or no gloss. A slight luster can be achieved with buffing after drying.
Performance
Finish should be matched against the potential degrading factors that will affect the floor in the
field. Factors may include; severity and type of traffic, substrate, ambient humidity, exposure to
water or chemicals, and access to recommended floor maintenance. The Tabor rating, a
measurement of wear resistance, may be specified and therefore will need to be considered in the
finish selection.
Costs
Coating cost is an important criterion for finish selection. Since coatings can have a wide
variation in cost it becomes necessary to balance cost against style and performance
requirements. In addition to the unit costs of the coatings the costs of application need to be
factored in to ensure the competitiveness of the final product.
Production Realities
Craft producers of prefinished floors are faced with producing a commercially viable product
with limited investment in plant, equipment, and personnel. When choosing a coating it may be
necessary to understand the limits of a smaller finish line. For example, a full filled style finish
may not be offered due to equipment limitations.
The small manufacturer should strive to maximize its flexibility by selecting appropriate coatings
and provide finishes that are compatible with their production equipment. Not all finishes are
adapted to craft prefinishing.
Chapter 3: Coatings, Chemistry, and Performance1
Production Floor Oils
Modern production oils are typically plant based oils with wax components. They feature
low or no volatile organic compounds (VOCs) They are applied by roller or spray and
penetrate the surface of the wood. The elements of the coating molecularly bond to the wood
imparting wear and moisture resistance. Oils are divided into three categories:
- Traditional Oxidizing Oils: oils that dry in the ambient environment by oxidation
- UV Curing Oils: oils with additional catalyst that promote immediate drying with exposure to UV energy. Complete cure requires some oxidation reaction.
- Colored oils: UV cure or oxidizing oils with added pigments.
- UV Oil Look: UV solids coatings not containing any oils but offering an oil appearance.
Since oils are penetrating finishes they have advantages over film coatings that include;
reparability in the field, a natural appearance, they are flexible to wood movement, and
the finish enhances the wood as opposed to covering it.
The resistance of oil finishes differs from film finishes in that the wood itself is the
barrier to damage. As may be expected, the floor is less resistant to impact and
mechanical abrasion. New advances in oils are yielding a more resistant product that
provides sufficient toughness for normal use while being easier to repair and rejuvenate
in the field.
Oils are also compatible with many special style treatments. They include staining, lye
treatments, distressing, and multicolor base coating.
Factory application of oils is a simple process wherein small amounts of oil are applied
(usually by roll coater machine) in one or two passes with the possibility of a denib sand
in between coats. Once dry the oil may be buffed if additional luster is desired. The
simplicity of application makes oils ideal for small lot production lines.
Oils tend to be relatively expensive in comparison to other coatings by volume but are
applied sparingly. The calculation of cost against other coatings should account for the
difference in spread rates.
Solvent Based Finishes
Solvent based finishes include many polyurethanes and acrylic urethanes. These coatings have a
solvent component which evaporates to dry the coating. Solvents may be organic such as toluene
and mineral spirits or less toxic such as water.
In production these coatings are usually sprayed then dried in convection ovens or air dried on
racks. The main application method is linear spray. They are often reserved for specialty finishes
where a high build finish is desired or a precise coating has been specified. Spraying of solvent
coatings is less popular in factories due to overspray waste and issues relating to handling short
parts.
Solvent based finishes encompass an extensive range of formulations and performance
characteristics. Limitations are usually defined by the choice of application method.
The cost of solvent finishes must be calculated by determining the spread rate in wet form and
then deducting the weight of the solvents that flash out. This will give the dry weight of the
finish applied, e.g., a water-based urethane is applied at 15 grams/ft2 and is 60% solids (therefore
40% solvent.) The actual dry weight of the coating applied is 15 grams x .6= 9 grams /ft2.
UV Coatings
UV coatings are the standard in factory prefinishing of wood floors. They are defined as
coatings that when exposed to high intensity ultra violet radiation undergo a polymerization
reaction to become a solid. UV coatings may be 100% solid or be combined with a solvent
for application reasons. In factory flooring applications 100% solids is used in more than
90% of applications and is applied with a roll coater.
The most common UV floor coatings are urethane acrylics. They are formulated with photo
initiators which absorb ultraviolet rays in the spectrum range of 200-400 nanometers. This
sets off a polymerization chain reaction that cures the coating. This process is complete in
seconds and is irreversible.
UV cured coatings first saw general use in the wood industry in the 1960’s as a fill material
for chipboard. At first they were expensive to manufacture and the cure equipment was
primitive.
As the coating and the equipment evolved it became apparent that clear UV finishes were
ideal coatings for production use on wood flooring. The UV coatings could be applied by
extremely efficient roll coaters in multiple passes. The finish was durable, resistant, and
extremely friendly to the environment. In addition, the production benefits for factory
application were enormous.
Production Benefits of UV
- High Speed Curing
- Minimum heat generated to affect substrate
- Minimum space requirement for cure equipment
- UV coating has extended pot life
- Low to no VOCs to affect air quality permits
- Immediate stacking and packing off line
- High quality finish
Additions to the coatings can include aluminum oxide and ceramic. Aluminum oxide is a
pulverized mineral that can be added to the sealer coats for wear resistance. It gives the wear
ability factor (Taber rating) to the flooring. It is put into the primary seal coats and then over
coated with a standard sealer to permit denibb sanding. The drawback of aluminum oxide is the
milky appearance that can result from addition of the mineral. Recent developments have strived
to minimize the aluminum oxide particle size (with nano particles) and maintain a high clarity
finish.
Fine ceramic materials can be added to the top coats to provide scratch resistance. There is an
ongoing debate in the flooring industry as to which is more important as a practical matter; wear
or scratch resistance.
UV coatings are also impervious to most solvents. They can be compatible with water base stains
and pre-treatments and can also be manipulated for gloss level.
Gloss level is a key style component in the appearance of flooring. Gloss is defined as the ability
of a surface to reflect light. It can enhance or detract from a floors appearance but does not affect
the properties of the finish. Gloss is measured by a gloss meter that reads in gloss units of 0-100.
Higher gloss finishes include bowling alleys and gym floors while matte finishes provide a more
natural or rustic look (see Table II, below).
Gloss Levels in UV Finishes
| Gloss Reading | Appearance | Typical Application |
|---|---|---|
| 0-10 | Matte | Rustic floors, European oil look |
| 10-30 | Satin | Warm residential looks |
| 40-60 | Semi Gloss | Common residential and commercial |
| 75+ | Gloss | Specialty floors, bowling alleys, etc. |
- Note: Floor coatings have endless variations and are beyond the scope of this paper to cover in detail. We will endeavor to cover the main coatings in production at this time. ↩︎
Chapter 4: Line Design & Layout
Matching Line Layout to Coating
The successful execution of a finish is like the proverbial 3 legged stool. All three legs are
necessary to make things function. In finishing; the customer, the machinery supplier, and the
coating supplier must all work together to design the line correctly.

The craft pre-finisher must choose the finishes that are marketable and profitable under the
constraints of money, facilities, and personnel. Once this is determined it is time to sit down with
the coating specialists to formulate the specifications necessary to complete the desired finishes.
This is the “recipe” that is then given to the equipment supplier. At that point, the equipment
supplier can propose various options for consideration.
In a perfect world the choice of line layout is easy. Since all things in a perfect world are free and
available the pre-finisher could have everything. However, this is rarely the case. Therefore,
prioritizing of the line layout is critical. The machinery representative can prepare several
options and discuss price. Flexibility is the key to small line layout. Experience teaches that the
craft pre-finisher should strive to implement a line that covers the majority of their applications
but not necessarily all of them.
Each coating supplier will have recommendations for application, conveying, curing, wiping,
and denibbing of their products. The properties of each manufacturers coating can differ as well
as their theories of use.
Production Requirements
How much finished floor product needs to be produced per shift? This answer will determine the
size and the speed of the line. A typical high production UV flooring finish line can produce
upwards of 40,000 sq/ft per shift. The small lot custom finisher may be less than 1500 sq/ft shift.
This production disparity should reinforce the specialty nature of a small finish line and the
choice of finish. This will also directly affect the Return on Investment (ROI) for the line.
In the case of oils there may be one or two coats applied but in UV solids that number may be 3-
6 coats. A line can be designed to handle both oils and UV with the determining factor being
number of passes and curing equipment. Craft production often utilizes 24” wide lines called
mini-lines instead of the 48” wide high production equipment.
The line output is calculated as follows:
Line Output =
(Belt width × Loading efficiency × belt speed × # minutes of production) ÷ number of passes through line
Example:
Belt width = 2ft
Loading = 3 pieces at a time, 4in width = ~50% load efficiency
Belt speed = 20ft per minute
Actual running time per shift (accounting for handlings and changeovers) = 300 minutes
Passes through line = 1 or 4
(2 × 0.5 × 20 x 300) ÷ 1 pass = 6000ft2 per shift
OR
(2 × 0.5 × 20 x 300) ÷ 4 passes = 1500ft2 per shift
Facility Considerations
Prior to confirming a final line specification the capabilities of the intended facility should be
reviewed carefully, see Table III.
Facility Considerations
| Consideration | Reason |
|---|---|
| Electrical power requirements | Amperage, voltage, phase |
| HVAC | Venting, dust control |
| Space requirements | Infeed and outfeed of longest piece |
| Raw material storage | Temperature control, logistics |
| Packing and finished goods storage | How and where |
Line Layouts for Roller Coating Oil
Line layouts for custom production or high production are quite similar for oils due to the limited
number of coats applied. The difference for traditional oils is the use of forced drying ovens
versus ambient drying. Line speeds in mini-lines for oils range from 20-35 fpm.
Traditional Oxidizing Oils Process
| 1. Oil application | 4. Brushing (redistribute oil and work into grain) |
| 2. Relax and penetrate/optional buff | 5. Ambient or hot air oven cure (drying) |
| 3. Optional second oil application (depending on manufacturer recommendations) | 6. Buffing after cure (optional) |
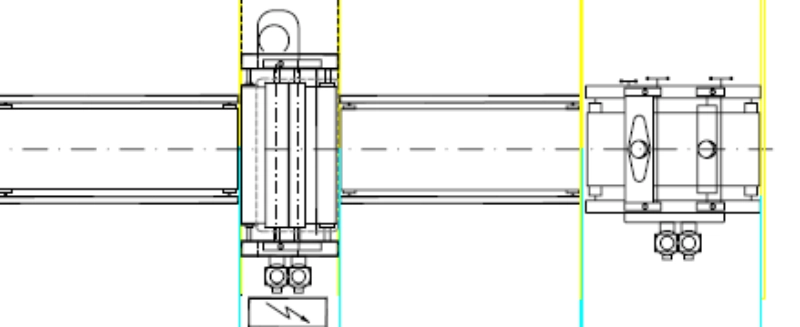
Infeed, single roll coater, conveyor, 2-head brush, outfeed conveyor
UV Cure Oils Process
| 1. Oil application | 3. Brushing (redistribute oil and work into grain) |
| 2. Relax and penetrate (optional buff) | 4. UV Cure |
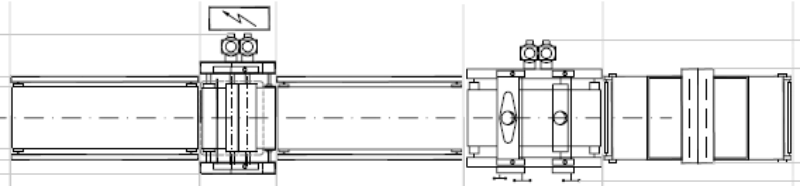
Infeed, single roll coater, conveyor, 2-head brush station, 2 lamp UV cure oven
Line Layouts for Coating UV Cure Finishes (100% Solids)
The success of the small UV flooring line lies in its ability to accomplish in a small
manufacturing cell (with multiple passes) what the large production line accomplishes in a single
pass (see this section for high production process). Since most custom work does not include a
grain filling step we can subtract this operation. In addition, the staining step can be done off line
or included in the line with the addition of a double roll coater. Line speeds for UV poly mini-lines run 20-35 fpm.
This leaves the application of sealers and topcoats as the primary focus of these lines. The clear
coat process is typically done in 3-6 coats as a combination of sealers and topcoats. Each coat
applies .3 -.5 ml. with a total thickness of 1.5 – 3 mls. The use of aluminum oxide in one of the
sealer coats requires the line has at least two roll coaters.
Basic UV Line (100% solids) w/Line speed 20-35 fpm Process
| 1. Denib cleanup | 7. Denib sand |
| 2. UV sealer (coat #1) | 8. UV topcoat #1 |
| 3. UV cure (partial) | 9. UV cure (partial) |
| 4. Denib sand | 10. Denib sand |
| 5. UV sealer (coat #2) | 11. UV topcoat #2 |
| 6. UV full cure | 12. UV full cure |
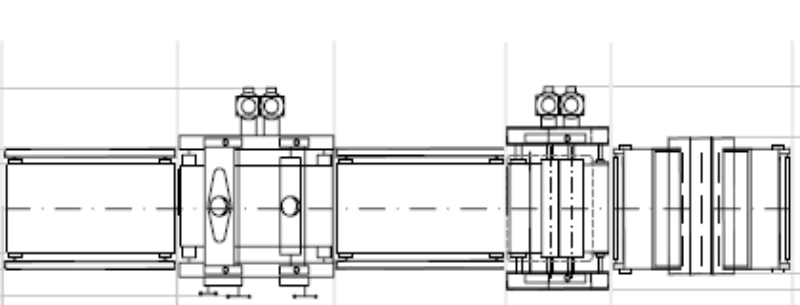
Infeed, 2-head denibber/cleaner, conveyor, single roll coater, 2 lamp UV cure oven
All Purpose Stain/UV Solids/Oil Line Process
| 1. Stain application (roll 1) | 8. UV full cure |
| 2. Stain wiping | 9. Denib sand |
| 3. Stain dry via UV lamp heat | 10. UV topcoat #1 |
| 4. UV sealer coat #1 (roll 2) | 11. UV cure (partial) |
| 5. UV cure (partial) | 12. Denib sand |
| 6. Denib sand | 13. UV topcoat #2 |
| 7. UV sealer coat #2 | 14. UV full cure |

2-Head denibber/cleaner, conveyor, double roll coater, conveyor, 3-head stain wiper, 3 lamp UV cure oven.
*Note: adding one additional roll coater and UV cure over will decrease number of passes through line in half and permit the use of aluminum oxide additive. This is recommended for higher volume work. As the requirement for additional coats or operations are needed, modules of coat and cure can be added.
When laying out the small craft prefinishing line it may be helpful to understand the process steps
of a high production UV line for comparison. High production lines can vary significantly in
design, complexity, and number of machines. However, the following will provide a basic plan
of the machine process:
High Production Floor Finishing Process
| 1. Infeed load conveyor | 13. Conveyor |
| 2. Calibrating sander | 14. Roll coater (seal) |
| 3. Conveyor | 15. UV cure (B stage) |
| 4. Stain roll coater (1 or 2 units) | 16. Roll coater (top coat) |
| 5. Conveyor | 17. UV cure (full) |
| 6. Stain wiping brushes | 18. Denib sand |
| 7. Stain cure (UV or convection dry) | 19. Conveyor |
| 8. Denibber | 20. Roll coater (top coat) |
| 9. Conveyor | 21. UV cure (B stage) |
| 10. Roll coater (fill) | 22. Roll coater (top coat) |
| 11. UV cure (full) | 23. UV cure (full) |
| 12. Denib sand | 24. Outfeed/packing conveyor |
Note: An additional coat/cure module is possible at either the seal or topcoat location.
Wood Preparation Prior to Finishing
The condition of the wood flooring prior to going into a factory finish line is critical. This
requires correct sanding procedure and timing. Onsite finishers have the luxury to lay the floor
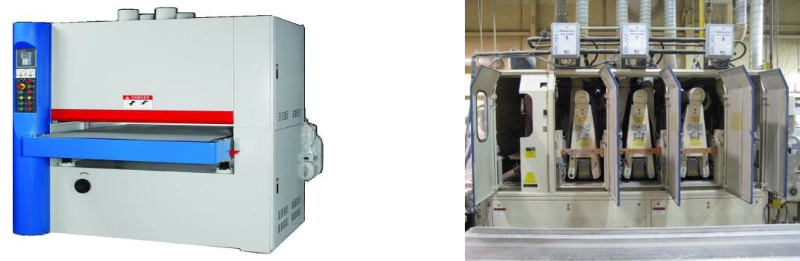
then sand and finish. This luxury does not exist for the factory finisher so a widebelt sander will
be needed to prepare the flooring after machining.
In a high speed prefinishing line for solid wood flooring the flooring is calibrated inline by a heavy
duty calibrating widebelt sander. This widebelt sander will have at least 5 sanding heads to
include a bottom head to create a reference. The flooring is machined oversize to allow stock
removal of 10- .020”. A typical head sequence follows:
- Bottom: 80 grit sandpaper
- Top: 80 grit
- Top: 120 grit
- Top: 150 grit
- Top: 180 grit
The use of such a large and costly machine is prohibitive for the small finish line. Still it is
necessary to sand the material and calibrate. If the flooring has edge bevels the accuracy of
calibration can be achieved with attention to accuracy in the milling and widebelt sanding. If the
flooring does not have bevels then offline calibration on the wide belt sander must be done with
care (top and bottom passes) to ensure there is no overwood when the floor is installed.
In the case of engineered flooring and well milled solid flooring the thickness variations usually
can be handled by a two or three head widebelt sander. Sanding should be done very close to the
time of finishing as wood can shrink and swell quickly and cause problems for the roll coater. It
may be advantageous to have the wide belt sander off line so that the wood can be multiple
passed if problems arise with the material from the mill. Alternatively, the sander can remain in
line with the sander’s outfeed conveyor on tracks to allow it to be moved out of the way if
required. A typical head sequence follows:
- Top: 100 grit
- Top: 120 grit
- Top: 150/180 grit (some manufacturers prefer 150 grit sand due to extended sanding belt life)
Chapter 5: Machine Theory & Operation
Direct Roll Coater
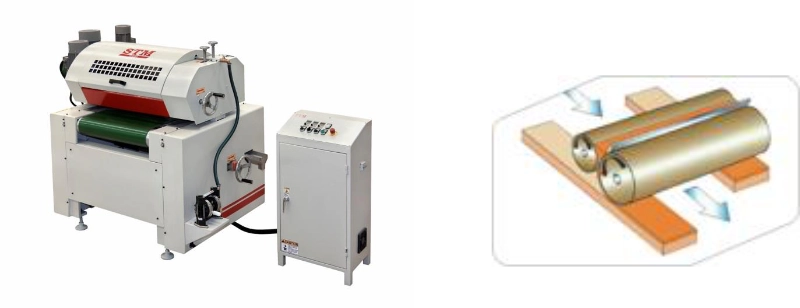
The roll coater is the primary application machine for flooring coatings. It applies thin coats of
finish utilizing a steel roller covered with rubber. It is highly efficient as it does not waste paint
and is simple to operate and maintain. Roll coaters are only suitable for flat surfaces although
with the appropriate durometer roll both hand scraped substrate and bevels can be coated
effectively. The most common roll coater in flooring is the differential direct roll coater.
Machine Terminology & Components
Direct Roll Coating: The application roll rotates in the same direction as the substrate.
Differential Roll Coater: Independent speed adjustment is possible on the conveyor, doctor roll,
and application roll.
Durometer: Hardness measurement of the rubber application roll measured as a shore value
typically 10-50 with the higher value being firmer and lasting longer (see table below).
Application Roll: Rubber covered roll that contacts the substrate to apply a thin coating.
Doctor Roll: Chrome or ceramic covered roller that creates the nip that determine paint quantity
and quality on the application roll. Most rolls are chrome plated but high aluminum oxide use
requires ceramic plating.
Doctor Blade: Thin metal or urethane scraper used to clean the doctor roll as it rotates to prevent
paint from falling onto conveyor.
Nip: contact point between doctor and application roll that determines material flow and
quantity.
Roll Durometers in Coating
| Durometer/Shore Units | Firmness | Applications |
|---|---|---|
| 10-20 | Soft | Stains, handscraped floors, large bevels |
| 20-30 | Medium | General purpose sealers and topcoats |
| 30-50 | Firm | Top coats, fine finishes, high usage |
Concept of Operation
The flooring substrate is loaded onto the conveyor belt with the goal of utilizing as much of the
belt width as possible. As the substrate comes under the rubber application roll the coating is
transferred onto the substrate by direct contact. The amount of coating has been determined by
the speed and distance of the doctor roll in relation to the application roll. Fine adjustments to
coating quantity include speed of doctor roll, rotation and direction of the doctor roll and the
pressure of the application roll to the work piece. For a more in-depth look at Roll Coating, click here.
Denibbing Sander
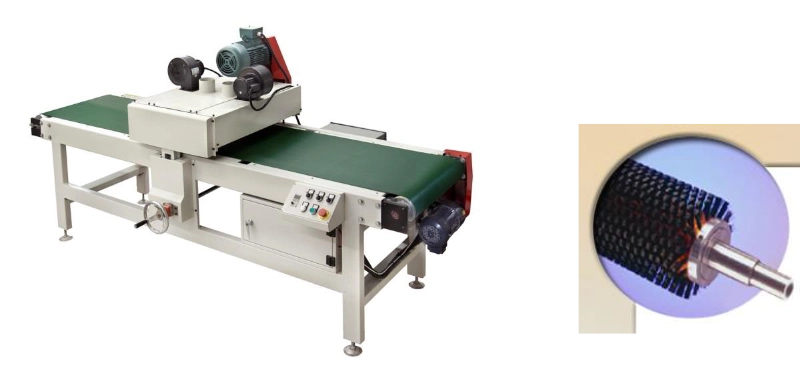
Machine Terminology & Components
Brushlon Heads: Abrasive brush head of nylon fibers impregnated with sanding grit.
Aluminum Oxide: pulverized mineral used as sanding grit.
Vacuum Bed: vacuum system on the conveyor used to hold small parts while sanding.
Application Roll: Rubber covered roll that contacts the substrate to apply a thin coating.
Air Knife: bar stretching across width of belt used blow away dust following the Denib.
Concept of Operation
Following application and cure of coating the surface will need to be smoothed and abraded for
subsequent coats. The choice of Brushon grit can be determined by a denibbing test on the
coating. The seal coats are designed to have sanding agents that allow the surface to slightly
powder for adhesion. The most popular grit choice is 180 but 120 grit can be used for more resistant sealers.
The cured flooring rides the conveyor under the first Brushlon head that has the desired rpm and
pressure. Immediately after, the second Brushlon head continues the abrading process. An air
knife following the second head blows away the sanding dust. Some units can also have an
additional Tampico cleaning brush and vacuum hold down. The choice of head configuration and
grit should be determined prior to specifying the machine. An air knife can be added after the last
brush head for cleaning but a care must be taken not to blow contaminated air on the work
pieces.
UV Cure Oven
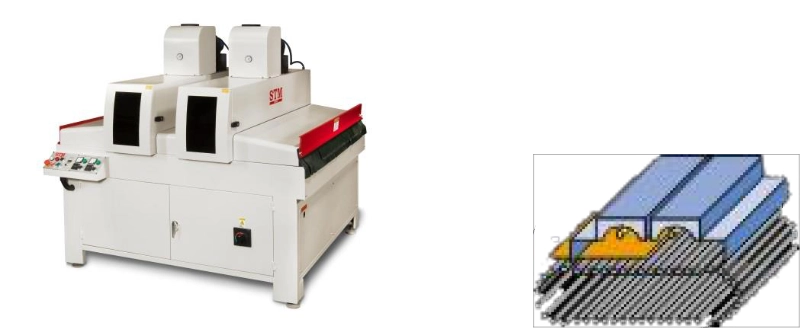
Machine Terminology & Components
UV Mercury Lamp: Lamp used to cure clear finishes.
UV Gallium Lamp: Lamp used to cure opaque finishes.
Reflector: Polished surface that reflects UV light downward onto the substrate (see Figure 1, below).
Milijoules/cm2: Measurement of UV radiation output by UV lamps.
Ballast: Transformer that supplies high voltage tor fire UV lamps.
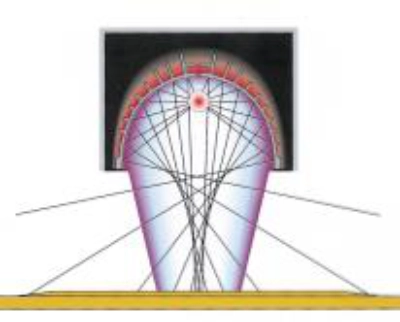
Concept of Operation
Once the coating is applied by the roll coater the substrate is conveyed into the UV cure oven by
means of chrome plated rollers. Due to the IR heat generated by the UV lamps conveyor belts are
less desirable than chrome rollers for this machine. UV radiation will be directed down onto the
substrate by means of a reflector which holds the lamp into position (see Figure 1 above).
The typical layout is 2-3 lamps with each lamp having a two stage hi-lo adjustment. The coating
will have a mj/cm2 rating to ensure curing. The m/j level can be achieved with the available
lamp adjustments and measured. Depending on the level of cure and coating requirements 1, 2,
or 3 lamps will be needed. Additionally, gloss can be manipulated by raising or lowering the
lamps thereby changing the angle that the UV rays reflect upon the work piece surface.
Stain Wiper
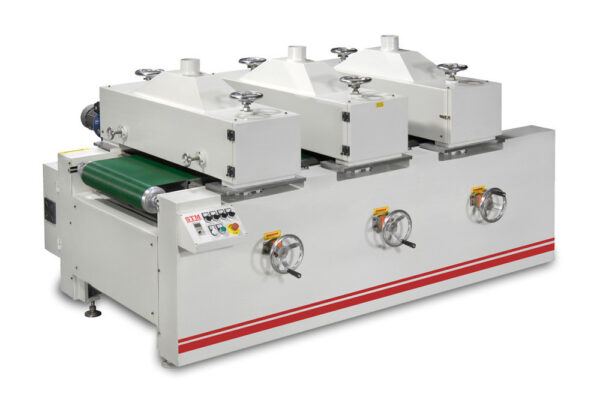
Machine Terminology & Components
Quick Change: System to remove and replace wiping brushes on pre mounted yokes.
Tampico Wiping Brush: Wiping brush of natural fibers for stains and general purpose.
Nylon Wiping Brush: Wiping brush of synthetic fibers for aggressive working stains into surface.
Horsehair Wiping Brush: Softest most pliable brush for redistribution of oils.
Concept of Operation
Once the roll coater has applied the stain the product must be worked into the grain and excess
stain remove. This process is done by the two or three wiping heads on the machine. Each head
has an adjustment for speed, rotation, and can be angled for more effectiveness. The choice of
brush type is important. Brushes can also be mixed on the same machine e.g. in oil finishing two
soft horsehair brushes may be followed by a nylon brush for a final aggressive wipe.
While the brushes are rotating they are contacted by a metal strip on a channel in the brush
enclosure that removes excess stain. The channel moves the collected stain to drip pans on the
side of the machine and collects it. Periodically the brushes need to be cleaned. This requires
they be removed and rotated in a solvent bath. This device is a simple stainless steel trough with
a holder to suspend the spindle in the solvent.
Material Handling
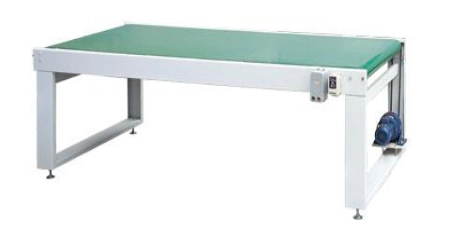
Concept of Operation
Material handling in the flooring line consists of conveyors in, out, and in between machines.
Conveyors not only move the work pieces but provide relax time for coatings and allow hand
work during production. A very important rule in line design is to keep work pieces from being
acted upon by two machines simultaneously.
Associated Items for Operation
In addition to the machines themselves other items of equipment that support the line
include:
- Gram scale for measurement of coatings weight
- Bucket heaters to maintain consistent coating temperature
- UV measurement radiometer
- Adhesion test equipment
- Gloss meter
- IR temperature probe
- Speed wheel (tachometer)
- UV safety equipment- UV glasses, gloves, hand cleaner, etc.
Chapter 6: Quality Control
ASTM Adhesion Test
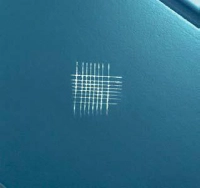
During the process of applying multiple barrier coats of finish to the flooring it is imperative to
have proper adhesion between coats. If sufficient adhesion is not present the floors may
experience delamination in the field. This can be catastrophic as the floor will need to be stripped
and refinished on site or removed and replaced. It is therefore necessary to check adhesion
during production.
Testing for adhesion can be done simply with the ASTM adhesion tape test D3359-09. In this
test a lattice pattern of six cuts in each direction is made to the film’s surface (Fig. 2). Then
pressure sensitive tape is applied to the lattice cuts and then pulled off and inspected. This is
done on several places on the work piece.
The inspection of the tape will reveal the extent (if any) of the coating separating from the
surface onto the tape. The relative percentage of coating removed will indicate the adhesion
level. The crosshatch test is a simple but accurate indicator to use during production.
Gloss Level
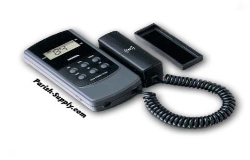
The gloss level on the final product needs to be monitored for consistency. This is especially true
for medium and low gloss finishes that are difficult to check visually. The gloss level is affected
not only by the coating specification but also by the application procedure and UV lamp settings.
A portable gloss meter (Fig. 3) can give the line operator a tool to maintain consistency.
Taber Testing
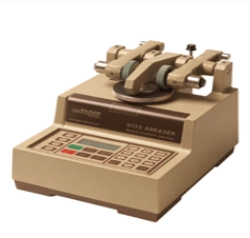
The Taber test is used to evaluate abrasion/wear resistance on a finished surface. The testing
machine (Fig. 4) is composed of an abrader wheel with a specified weight attached to it. The
abrading wheel is placed on the surface of the substrate and the substrate is rotated until the
finish is removed down to the wood. The number of revolutions required to accomplish this is
the Taber cycles. The higher the Taber value the more resistant the finish.
Taber ratings in prefinished flooring can range from 200-1500 cycles. Residential floors have a
lower requirement for wear resistance than do commercial floors and this reflects in the Tabor
ratings. There is much debate in the industry surrounding the effectiveness of Taber ratings as a
true wear indicator and the possible distortion of Taber values in marketing campaigns. High
abrasion resistance in wood flooring is desirable however it is achieve by adding aluminum
oxide to the finish which can detract from the clarity of the final product.
Additional Quality Tests
- Impact resistance
- Water resistance
- Scratch resistance
- Wine resistance
- Coffee resistance
Here at Stanza Machinery, we provide high-quality prefinishing equipment and top of the line customer service. To find out more about what we offer, contact our team of specialists today!